My 12 Sweater Challenge is going really well. Almost too well. It's the end of January and I'm nearly done with sweater #6. At this rate, I will have to buy more yarn before the end of the year....gah! I credit project monogamy for this progress.
An idea hit me. I'm the kind of person who will see a pattern that I want to make and then run out and buy the perfect yarn for it. Meanwhile, I discount the fact that I have a stash of perfectly good yarn at home that would work just fine. It's the thrill of the chase.
I'm going to continue with my sweater project. It's going really well and motivating me to burn through stash like crazy. However, I am going to challenge myself with a new game as well. One that might ensure I have less stash in the end. I will attempt to methodically go through my stash alphabetically and choose a project for each yarn. This is a good alternative to choosing a yarn for each project I want to do. Thanks to the stash organizational skills that Ravelry has given us, I have a pretty good idea that I have too much yarn just lying around.
Here are my self-imposed rules to the Alphabet Stash Challenge:
1. Spinning stash doesn't count. A lot of my listed stash is stuff that will be carded and blended into something else. Lots of times, this resulting product gets sold. I'll deal with my spinning stash on my own terms.
2. Handspun does count. I've got lots of odd and sample skeins that need to go.
3. Sweater projects are exempt from the Alphabet Stash Rule. I've got a pretty good idea that I won't be wanting to knit a C for Camel sweater when the thermometer says I should be knitting an L for Linen sweater.
4. Anything that I skip because I can't be inspired for a project will be given away.
5. Weaving projects count.
6. I think I should have a rule here about not adding to my stash. Sadly, MDSW is coming up. I can not make such ridiculous promises.
7. Ravelympics project is exempt.
8. Matching sets? Am I still thinking I might make myself one?
I have to dig through my stash over the weekend and find anything hiding that I've forgotten to add to my list or anything that gets tossed before I start. Squeee!
Friday, 29 January 2010


Thursday, 28 January 2010
FO- Winter Romance
It's the time of year where I get a wee bit stir crazy. That winter doldrum sets in and I start dressing more for comfort than style. I dream of the day where I won't need the soft gurgling of a humidifier to lull me to sleep, and hat hair would be optional.
I had 12 skeins of a discontinued color of Noro Silk Garden in my stash, waiting for a little inspiration.
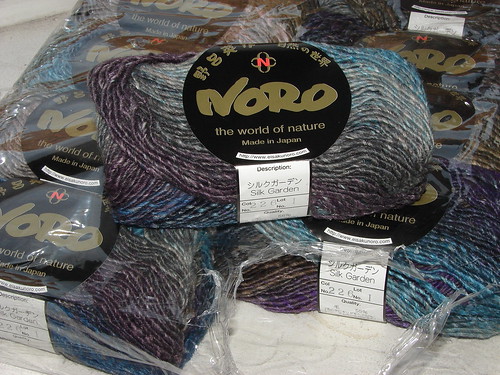
I loved these colors together- royal blue, turquoise, peach and a deep purple balanced nicely with more neutral browns and grays. The whole effect reminds me of a cold winter dusk turning into a long dark night.
Try as I might, I couldn't find a pattern that I felt was right for this yarn. There are tons of patterns out there that utilize this kind of yarn, but I found a great deal of them unflattering or awkward. I wanted something a little sexy and, above all, flattering. Something this colorful needs a simple design but I wanted to make the stripes work with my shape.
So I sat down with a tape measure, graph paper and a calculator, knitted up a gauge swatch and started to design my own.
The end result:
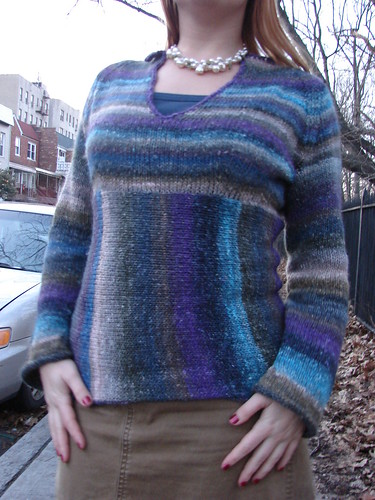
I did not want horizontal stripes around my mid-section. No matter how much time I spend at the gym, I can not banish the feeling that my Buddha belly is here to stay. I can't help it. I love my carbs. On the other hand, I really don't mind appearing bustier than I actually am, so I was pretty okay with the idea of horizontal stripes across the boobs.
I started out by knitting a panel, grafted it into a tube and then picked up stitches along the top. I then did bust shaping- I found this guide to be most helpful when it came to placement. I also wanted to show a bit of skin, so I made a deep V-neck at the same time I started the raglan shaping. The sleeves are fitted until the wrist, where I increased them to a bit of a flare. I finished it by picking up stitches along the bottom and the sleeves for a couple rows of purl, and a row of single crochet along the neck. I have to go back and fix the top edge of the collar as it likes to fold down.
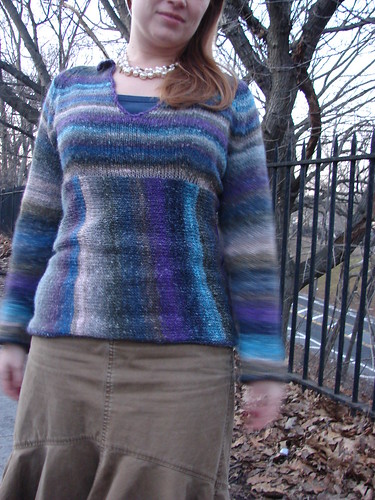
It fits me perfectly.
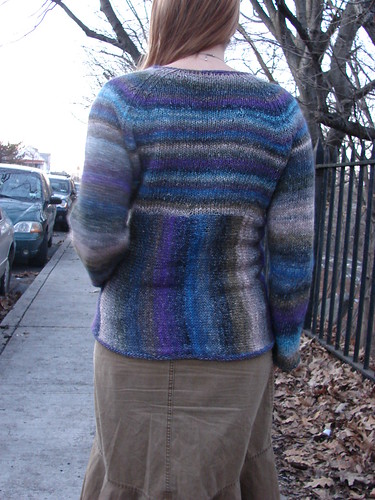
It's graceful, romantic and warm. Exactly what I want to wear this time of year to get me out of my winter funk.

I'm in the camp of "math is hard, it hurts by brain". Once I got over that fear, I found it really simple to figure out how to do the math on a sweater. Since the math was applied and not abstract I could get my head around it.
The specs: I used all of 9 skeins of Silk Garden- 1098 yards- on a size 7 needle. I went down to a size 6 on the trim. It took me a hair over two weeks from start to finish. I started out using EZ's percentage system but once I figured out how the game was played, I went along with my gut and invented my system based on my personal measurements. I tried it on quite a bit as I went to figure out how far I wanted the raglan decreases to go. That helped me make little tweaks for a better fit.
I had 12 skeins of a discontinued color of Noro Silk Garden in my stash, waiting for a little inspiration.
I loved these colors together- royal blue, turquoise, peach and a deep purple balanced nicely with more neutral browns and grays. The whole effect reminds me of a cold winter dusk turning into a long dark night.
Try as I might, I couldn't find a pattern that I felt was right for this yarn. There are tons of patterns out there that utilize this kind of yarn, but I found a great deal of them unflattering or awkward. I wanted something a little sexy and, above all, flattering. Something this colorful needs a simple design but I wanted to make the stripes work with my shape.
So I sat down with a tape measure, graph paper and a calculator, knitted up a gauge swatch and started to design my own.
The end result:
I did not want horizontal stripes around my mid-section. No matter how much time I spend at the gym, I can not banish the feeling that my Buddha belly is here to stay. I can't help it. I love my carbs. On the other hand, I really don't mind appearing bustier than I actually am, so I was pretty okay with the idea of horizontal stripes across the boobs.
I started out by knitting a panel, grafted it into a tube and then picked up stitches along the top. I then did bust shaping- I found this guide to be most helpful when it came to placement. I also wanted to show a bit of skin, so I made a deep V-neck at the same time I started the raglan shaping. The sleeves are fitted until the wrist, where I increased them to a bit of a flare. I finished it by picking up stitches along the bottom and the sleeves for a couple rows of purl, and a row of single crochet along the neck. I have to go back and fix the top edge of the collar as it likes to fold down.
It fits me perfectly.
It's graceful, romantic and warm. Exactly what I want to wear this time of year to get me out of my winter funk.
I'm in the camp of "math is hard, it hurts by brain". Once I got over that fear, I found it really simple to figure out how to do the math on a sweater. Since the math was applied and not abstract I could get my head around it.
The specs: I used all of 9 skeins of Silk Garden- 1098 yards- on a size 7 needle. I went down to a size 6 on the trim. It took me a hair over two weeks from start to finish. I started out using EZ's percentage system but once I figured out how the game was played, I went along with my gut and invented my system based on my personal measurements. I tried it on quite a bit as I went to figure out how far I wanted the raglan decreases to go. That helped me make little tweaks for a better fit.
Tuesday, 26 January 2010
Gussied-up Chapeau
Remember the Chapeau Mariner? I finished it last November. I threw on a satin ribbon that I had lying around in my stash and wore it for a bit.
I realized last week that my hat needs a face-lift. It's super cute, but I just wasn't wearing it that often. Beverley Trimmings to the rescue. Beverley is a glorious mess of a store...it's piled to the ceiling with buttons and fabric and notions. It's hard to browse, but it's good if you know exactly what you want or have the patience to go on a treasure hunt, you are usually rewarded.
I got lucky and found this cute vintagey button. I grabbed it and then fought my way over to the wall of ribbon to find something that matches. Five minutes with a needle and thread and VOILA!
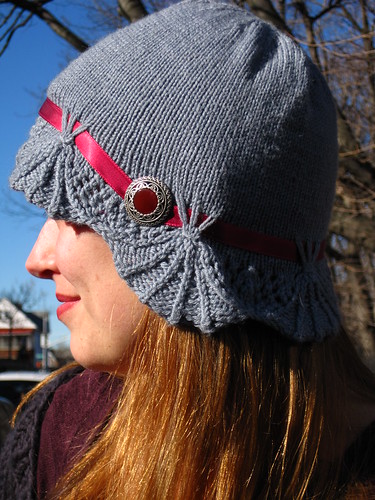
I think it makes the hat. I've been wearing it constantly since I made the change.
I realized last week that my hat needs a face-lift. It's super cute, but I just wasn't wearing it that often. Beverley Trimmings to the rescue. Beverley is a glorious mess of a store...it's piled to the ceiling with buttons and fabric and notions. It's hard to browse, but it's good if you know exactly what you want or have the patience to go on a treasure hunt, you are usually rewarded.
I got lucky and found this cute vintagey button. I grabbed it and then fought my way over to the wall of ribbon to find something that matches. Five minutes with a needle and thread and VOILA!
I think it makes the hat. I've been wearing it constantly since I made the change.
Monday, 25 January 2010
Felting
I recently took a class on wet felting. It's really super simple, and it has a lot of room for creativity. All you need is bubble wrap, soap and water, mosquito net, a rolling pin and wool. The only real problem is that it makes a mess- soap and water and slippery goop everywhere- so it might be a good outdoor picnic table project. I plan on getting one of those table cloths made out of plastic for my dining room table. You do need a pretty big surface area to do this (keep in mind anything you make will lose 30% of its length), and that's the only one I've got big enough.
Here's one of my FOs:

It's about 2 oz of handpainted corriedale roving. I laid it out in a loose, wavy grid on my bubble wrap. After the felting process, it actually becomes fabric, so it's much stronger than it looks.
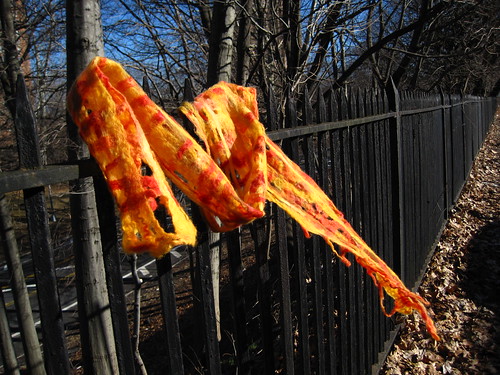
It's really light and airy though. I did a few other pieces and experimented with density and color, but this is the one I like best.
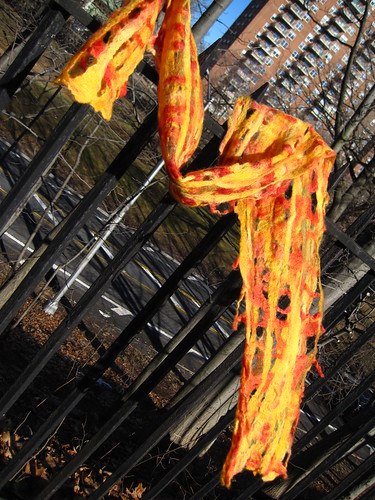
It's also an excellent way to use up odd bits of roving. You don't need that much to begin with, but I made an interesting piece using bits of neps for texture.
I love the looks of a felted scarf, but if you sew, you can actually make garments out of your wet felt.
I found this basic guide online, but it's pretty dry...I'll plan on doing a photo tutorial soon.
Here's one of my FOs:
It's about 2 oz of handpainted corriedale roving. I laid it out in a loose, wavy grid on my bubble wrap. After the felting process, it actually becomes fabric, so it's much stronger than it looks.
It's really light and airy though. I did a few other pieces and experimented with density and color, but this is the one I like best.
It's also an excellent way to use up odd bits of roving. You don't need that much to begin with, but I made an interesting piece using bits of neps for texture.
I love the looks of a felted scarf, but if you sew, you can actually make garments out of your wet felt.
I found this basic guide online, but it's pretty dry...I'll plan on doing a photo tutorial soon.
Thursday, 21 January 2010
FO- Belle Cardigan
This might have been the fastest thing I've ever knit. I cast on sometime on a Friday morning and I was wearing it Saturday afternoon.
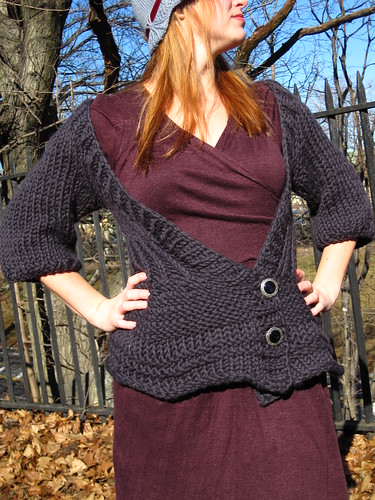
It's the Belle Cardigan from Interweave Knits Fall 2007. While not the most wearable garment, I'm happy with how it came out with some modifications.
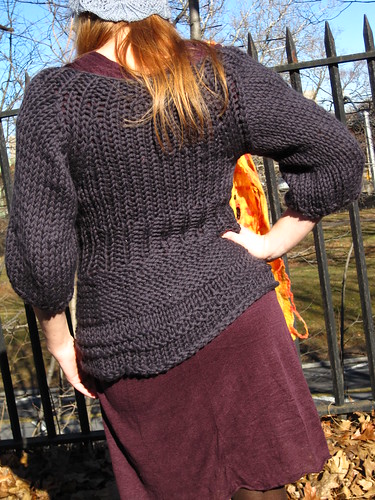
Most Wenlan Chia patterns are notorious for their lack of pattern editing, mistakes and miserably vague instructions- they just don't seem like a real knitter sat down and worked things out. This one made much more sense...I'm thinking that the editors at Interweave went to work on it. The instructions were clear and concise.
I made the 29.5 inch size. That seems impossibly tiny, but this does stretch quite a bit and the two halves don't meet in the middle. It's meant to be a bit curve-hugging.
Some mods: The entire thing is written in reverse stockinette stitch (purl-side showing). I think that adds bulk, and I don't personally need that, so I reversed the whole garment. I also left the patch pockets out...I don't need more super-bulk yarn at the point of my waist where I need less bulk. Besides, I loathe useless pockets. The sleeves are supposed to be big and blousey. I just went down to the instructions for the small size to make them more fitted- yarn this chunky doesn't flow and drape, so the blousey looks more like arm-fat underhang. The only other thing I wish I would have done is to knit the sleeves in the round. The seams are grand-canyon big.

It fits kind of weird in the end...I keep trying to push my boobs down so they are covered by the edge of the cardi. It seems a bit odd to have something on that isn't covering you boobs. It will be a nice cover-up for a dress or a plain tight-fighting top. Since it's merino, there's no itch so it's comfortable on bare arms. I did have a rather epic struggle trying to put a coat over this- the sleeves ended up riding all the way up to my armpits and with the overcoat on, it looked like I was about to go out and play football.
The specs: I used all of 4 skeins (348 yards) of Rowan Big Wool in charcoal, which is too bad because I was trying to use up the 5 skeins that I owned. The body was knit on size US 17 needles, and the ribbing was done on US 15.
It's the Belle Cardigan from Interweave Knits Fall 2007. While not the most wearable garment, I'm happy with how it came out with some modifications.
Most Wenlan Chia patterns are notorious for their lack of pattern editing, mistakes and miserably vague instructions- they just don't seem like a real knitter sat down and worked things out. This one made much more sense...I'm thinking that the editors at Interweave went to work on it. The instructions were clear and concise.
I made the 29.5 inch size. That seems impossibly tiny, but this does stretch quite a bit and the two halves don't meet in the middle. It's meant to be a bit curve-hugging.
Some mods: The entire thing is written in reverse stockinette stitch (purl-side showing). I think that adds bulk, and I don't personally need that, so I reversed the whole garment. I also left the patch pockets out...I don't need more super-bulk yarn at the point of my waist where I need less bulk. Besides, I loathe useless pockets. The sleeves are supposed to be big and blousey. I just went down to the instructions for the small size to make them more fitted- yarn this chunky doesn't flow and drape, so the blousey looks more like arm-fat underhang. The only other thing I wish I would have done is to knit the sleeves in the round. The seams are grand-canyon big.
It fits kind of weird in the end...I keep trying to push my boobs down so they are covered by the edge of the cardi. It seems a bit odd to have something on that isn't covering you boobs. It will be a nice cover-up for a dress or a plain tight-fighting top. Since it's merino, there's no itch so it's comfortable on bare arms. I did have a rather epic struggle trying to put a coat over this- the sleeves ended up riding all the way up to my armpits and with the overcoat on, it looked like I was about to go out and play football.
The specs: I used all of 4 skeins (348 yards) of Rowan Big Wool in charcoal, which is too bad because I was trying to use up the 5 skeins that I owned. The body was knit on size US 17 needles, and the ribbing was done on US 15.
Tuesday, 19 January 2010
Shop Update and some Self-Serving Charity

I'm doing a really big upload today to my Etsy Store today.

Lots of spindles in this update. I've been really busy lately, so when I have a few hours to sit down and make these, I tend to make a lot all at once.
The humanitarian in me has decided to donate 25% of all profits from now until February 1 to Doctors Without Borders. This includes spindles, handpainted roving, batts and yarn. I call this self-serving charity- you can buy yourself pretty things and feel good knowing that your money is going to a good cause. Etsy doesn't seem to have a charity function set up, so I'll be doing one big donation at the end of the month.
Monday, 18 January 2010
FO- Avast
I think I've made it clear how much I love knitting men's sweaters (well, one man in particular anyway). Endless fields of mindless and comforting stockinette stitch, round and round for miles. It's the only project I can take with me to the movie theater and knit for hours in the dark and not have to worry about a pattern or a dropped stitch.
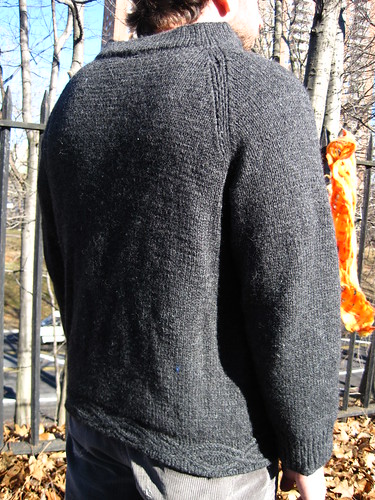
The Avast was no exception. It had a finicky little cable band at the bottom, stitches were picked up along the long edge of it, and the rest went on and on forever. The actual knitting portion of this only took me a couple weeks, but it did take forever to finish. There was a hem that went around all the edges that had to be sewn up. I ended up not liking the hemmed sleeves, so I ripped them out and did a few inches of ribbing instead. I had to go out and buy a zipper, and then sew the said zipper in. The bottom puckered in too much, so I took out the last row and did a stretchy bind off instead. This helped, but I still would like to try and stretch the bottom out a bit more to make it fit better...the cabled band isn't nearly as horizontally stretchy as the rest of the sweater so it doesn't want to stay stretched out. More blocking should fix the problem.

Now that I'm looking at it, one sleeve seems a bit short. That will get a good medieval blocking as well.

I also want to re-block the collar. It got a bit smooshed and now it's doing a wavy thing. I might tear open the seam and put some of those plastic collar tabs in there to help with the shape.
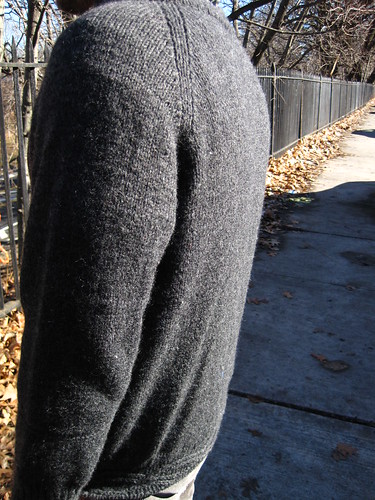
I made the 44" size, so there is about 2 inches of ease to the garment. I used Valley Yarns Northhamptons- this is my go-to 100% wool workhorse yarn. It wears really nicely, it's reasonably soft and it's fairly inexpensive- it's $5 for 247 yards. I used about 1850 yards total for this. It's a warm, masculine, wearable sweater.
The Avast was no exception. It had a finicky little cable band at the bottom, stitches were picked up along the long edge of it, and the rest went on and on forever. The actual knitting portion of this only took me a couple weeks, but it did take forever to finish. There was a hem that went around all the edges that had to be sewn up. I ended up not liking the hemmed sleeves, so I ripped them out and did a few inches of ribbing instead. I had to go out and buy a zipper, and then sew the said zipper in. The bottom puckered in too much, so I took out the last row and did a stretchy bind off instead. This helped, but I still would like to try and stretch the bottom out a bit more to make it fit better...the cabled band isn't nearly as horizontally stretchy as the rest of the sweater so it doesn't want to stay stretched out. More blocking should fix the problem.
Now that I'm looking at it, one sleeve seems a bit short. That will get a good medieval blocking as well.
I also want to re-block the collar. It got a bit smooshed and now it's doing a wavy thing. I might tear open the seam and put some of those plastic collar tabs in there to help with the shape.
I made the 44" size, so there is about 2 inches of ease to the garment. I used Valley Yarns Northhamptons- this is my go-to 100% wool workhorse yarn. It wears really nicely, it's reasonably soft and it's fairly inexpensive- it's $5 for 247 yards. I used about 1850 yards total for this. It's a warm, masculine, wearable sweater.
Subscribe to:
Posts (Atom)